Showing posts with label home improvement. Show all posts

Wednesday, December 21, 2011

Fireplace Completion!

I have a completed fireplace!!!
Yes, it took us 3 months to finish the mantel.
We like deadlines...and I was all "I AM having a decorated mantel for Christmas."
So hubby got er dun.

You can see the progression of our fireplace project in these posts...

We debated on what to do with the mantel.
We ended up sanding down the weird piece of wood we had and staining it a dark brown.
And by "we" I mean "hubby"...with my design direction of course ;-)
And I'm pretty pleased with how it turned out.

Here's the final reveal.
We'll make it a Christmas reveal.

Christmas Fireplace 2010


Christmas Fireplace 2011

What do you think???

Here's some other views...


Merry Christmas!

Monday, September 19, 2011

Fireplace Mantel

Neither of us want to use the wood mantel that was originally on our fireplace.  The wood is weird and soft.  It grosses me out...gives me the heeby jeebies.  So we were just going to buy a chunk of wood...that's the technical name for it right...chunk?  And then stain it a dark brown.  But then our wheels got to turning.

What if we built a mantel with this technique...

pic from here

It wouldn't cover the whole fireplace like they did, but just a mantel made of stacked wood of different stained colors.


Or what if we got an old barn beam or other reclaimed wood with age and history and sanded and stained it??  Something like this...


pic from here

Reason #152 why I have an amazing husband: I thought I remembered driving by an architectural salvage yard in the Winter Park, FL area years ago.  I can still picture it in my mind.  But I researched online for hours and could find no mention of it.  While we were out running errands...I asked hubby if we could just drive around and see if we drove by it.  And he agreed folks!  So we just drove up and down streets in Winter Park for who knows how long.  And we did NOT find it.  Must of been a dream.  What does it mean when you dream about architectural salvage stores?  Hmm.

But we did find this little amazing cute place... 1618 Something Different

check it out here

Then I remembered that Cortney Novogratz went there in this episode of Home by Novogratz (fast forward to 13 min to see the store).

We loved looking at all the vintage retro furniture!  I kept thinking "my parents use to have end tables like that" and "my grandparents have a dresser just like that in their house right now."  And if my mom can figure out how to email a picture to me...I might have a blog post about that in the future.  Luv ya mom...but really...pretty sure I've explained that whole email attachment process to you about a bazillion times.  And that is why I have designated my hubby as our friendly family technical support.  Cuz I cain't handle it no mo'.  Smiles.

Anyways...back to the fun retro furniture.  I love the look of a lot of the vintage furniture, but I wouldn't know how to incorporate it into our current design and current furniture.  That is where it is plain to see that I am not an interior decorator (insert sad face here).

I think we'll be making a trip to Deland to visit this fun little place in a couple weeks.  Hoping to find an old chunk of wood there :-)

Friday, September 16, 2011

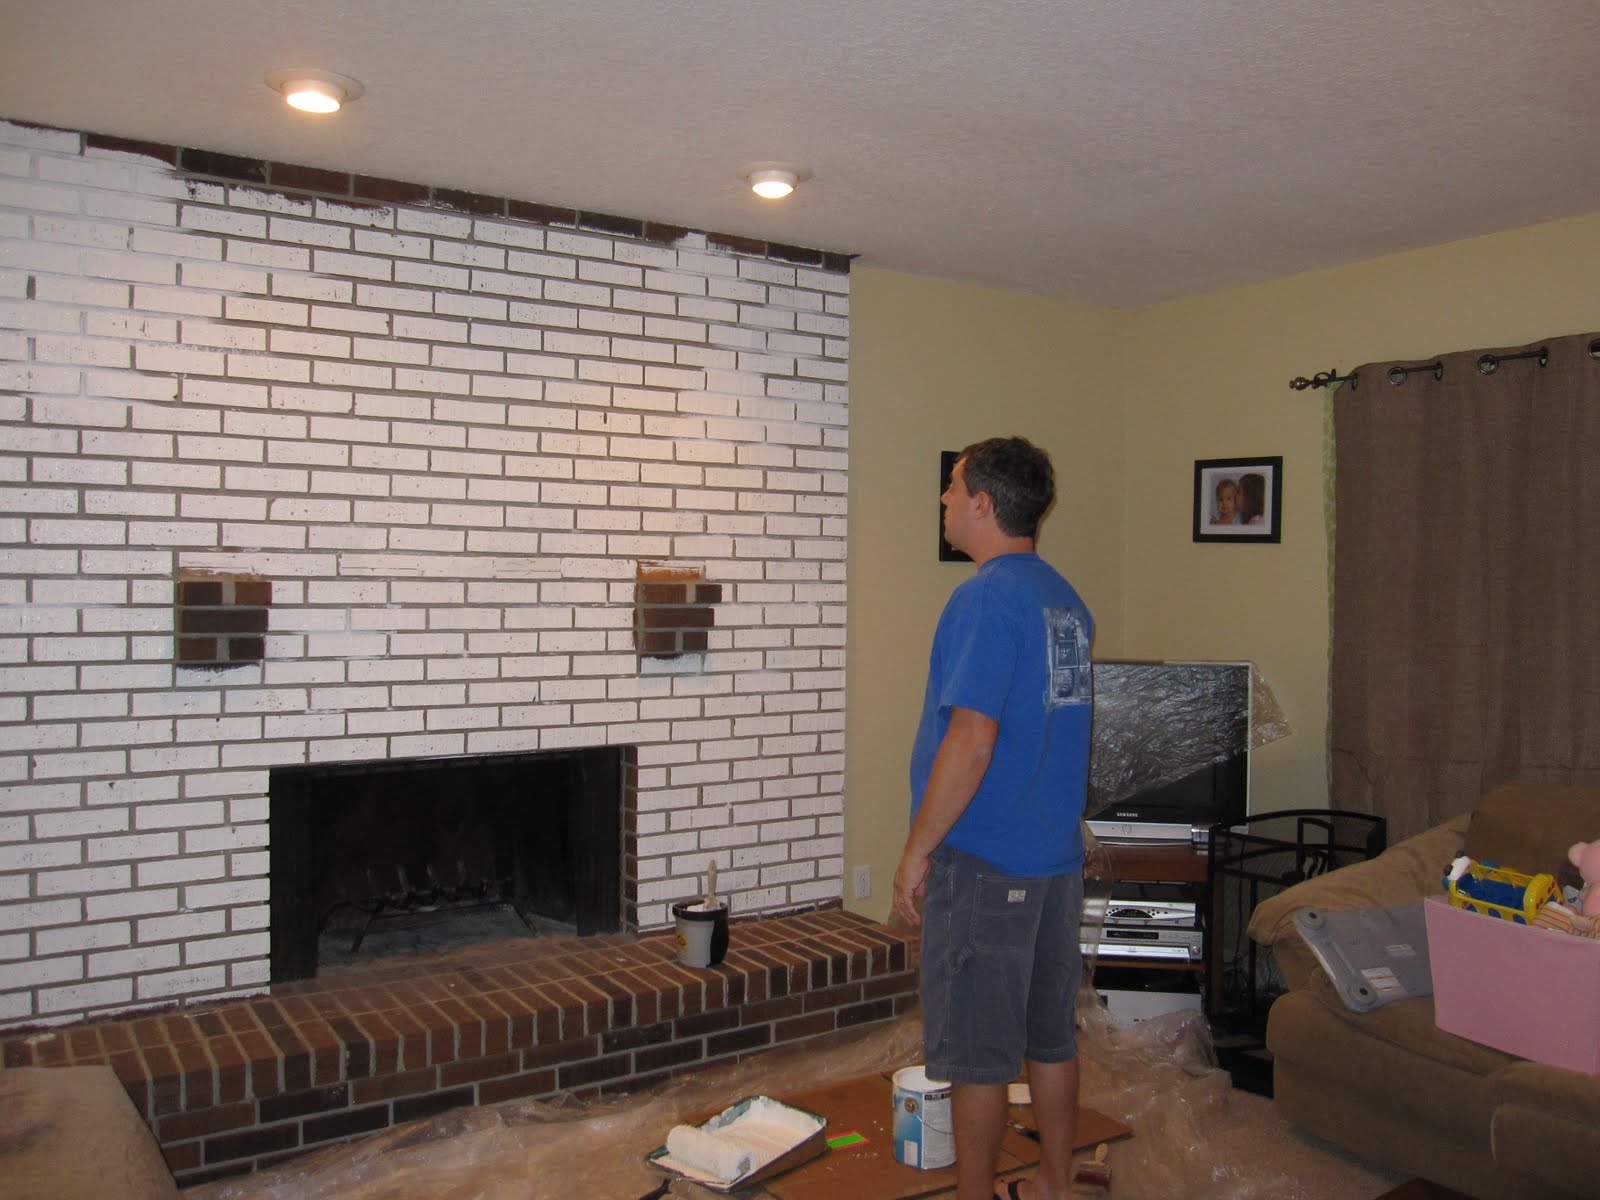
Fireplace Progress #2

We are taking our time with the fireplace.  That's why this one day project is taking pretty much several weeks.  We are only working on it after the kids go to bed at night.  Neither of us want to corral them in the other room while they both scream and cry because the gate is up and they can't get to their precious "DADDDDDDDYYYYYYY!"

We are breaking this up into 4 Phases.

Phase 1 - paint top portion - COMPLETE!
Phase 2 - paint bottom portion - COMPLETE!
Phase 3 - build mantel - in design phase ;-)
Phase 4 - decorate - in design phase ;-)


End of Day 4
Primer coat finally done!


Day 5
Putting the real paint on (semi-gloss)

End of Day 5
Phase One - COMPLETE!!


End of Day 6
Primer coat on hearth complete!  BTW...I learned just the other day that the shelve thing is called a hearth...who knew?!


End of Day 7
Phase 2 - COMPLETE!
I promise our walls are beige.  There is a light out of frame on the left that makes it look green over there.  And the lamp is not green either.  I don't know what's going on!

I am LOVING it!
I thought the white would be a little shocking...but it's just the opposite.  It just blends into the wall so much better than the original brick.

Here's a little "in progress" Before and After

What do you think??

Tuesday, September 6, 2011

Displaying Your Kid's Artwork

I love showing off my kid's artwork!  It may not look like much right now (they're only 3 and 1!), but it makes them feel so good to see it up on display for everyone to see.  And it makes me feel good too!  But how do you display it in a "nice organized aesthetically-pleasing" way??

We spent the summer in Fort Collins, CO working at a conference for Campus Crusade for Christ.  We stayed in a furnished apartment and had very little "decor."  So I took the liberty of making one of the prominent walls in the apartment - the ART WALL.  Anna and Ellie were in a childcare program run by the conference all summer and came home with LOTS of art.  I couldn't get away with something like this in my home...it's not the most classy display...but for the summer it was SO fun!


The flower pictures on the other wall came from a garage sale for less than .10 each.


Ellie contributed a few things to the wall too!  Such a wonderful picture of my babies...umm no!
 
Now that Anna has started preschool...I'm preparing myself for lots of great artwork!  Here's what I came up with...


I could have at least straightened up the bookshelf first...goodness gracious!


It's so easy to make! 
  1. Just hang up some string or ribbon on the wall.  I used string and push pins I already had in my supply :-)
  2. Find or buy some cheap wooden clothespins.  I already had them in my house from a shower I hosted a while back where we played one of those clothespins "Don't say Baby" games ;-)
  3. Cut out letters out of paper.  I used scrapbook and crafting paper I already had in my supply.  Don't waste a lot of time on it (I just free handed cut them out).  I like that it looks "homemade"...it's for your little one's artwork!  It's not supposed to look sophisticated.  And you could make it spell anything really.  Or you could cut out little pictures of your kid.  Or if they are old enough, you could have them cut out letters or other shapes or whatever they want.
  4. Glue the letters (or other things) onto the clothespins.
  5. Hang your precious baby's art for the world to see!  It's so easy!  And for me...it was FREE (since I already had all the supplies)!
Once it fills up...I think I'll just take down my least favorite ones and keep them in a folder till the end of the school year.  Then I might try to do one of the ideas below before tossing a bunch of the art.  It hurts to throw the stuff away, but I just don't have room in this house for boxes of coloring pages half colored purple ;-)  Oh...and don't forget to write the date on the art!  You might think you'll remember what year it came from...but most likely...you won't!

Idea #1 - Ok...first great idea comes from Home by Novogratz (love them BTW). Shrink Art Collage by Jan Eleni - go here and click on "collage"


Picture from here


I think this would be pretty easy to make...time consuming...yes...but not too difficult.  You'd basically scan or just take a pic of all your kid's artwork from the year and compile them in a grid using some sort of program.  Gosh...I bet you could do this with publisher if you don't have any fancy designy programs on your computer.  Then you could just get it printed anywhere they print poster size pictures.  Looks like at most it would be $15 (+ shipping potentially) at Walgreen's.  Isn't that a great idea?!

Idea #2 - comes from an episode of Design Star - click here and go to picture 6. 

Picture from here

The designers were redoing a family's basement in this episode.  They wanted it to be a space for the kids and adults.  Designer contestant Leslie made this art collage from the kid's artwork.  I'm pretty sure she just decoupaged it on a canvas.  It's a little messy looking for me (I'm all about the symmetrical organized look of idea #1), but I'm sure you could make it look however you want it to look.  I still think it's a great way to preserve and display your kid's artwork!  Right?!

How do you display your kid's artwork?  I'm sure there are a million ideas out there!

Monday, September 5, 2011

Fireplace Progress

BEFORE PICTURE


DAY 1
Trying to get the mantle off


Big Strong Hubby got the mantle off


Cleaning the bricks - vacuuming


Brushing them off

ewww...it's flinging little pieces of mortar at me

oh my gosh it's getting worse...I think it went in my mouth!

ok...much better :-)


Caulking the big holes so they don't appear all shadowy after painting


END OF DAY 1
Taped off and ready to paint - we were afraid to use the tape on the ceiling in fear it might pull the texture off


DAY 2
I did the honors of putting on the first paint!


Already looking better


END OF DAY 2
We couldn't even finish the primer coat the first day of painting.  It is MADDENING trying to get paint into every nook and cranny...and time consuming...my goodness!


END OF DAY 3
Still not totally done with the primer coat, but we didn't have much time to work on it this day.  We're calling that bottom stoop "Phase 2"...caus we still need to be able to stand on it to paint the rest.


Some lessons I've learned during this process...mostly ones I already knew ;-)
  1. I am not very patient
  2. I have an amazing husband
  3. I hate painting bricks
  4. I am NOT a perfectionist
  5. Why in the world is that fireplace to stinking big when everyone else online has fireplaces the size of a peanut????
  6. It looks WAY better white
  7. We've made the right decision

One last remark to leave you with.  This was Anna's reaction to waking up and seeing a white fireplace.
"I would have painted it purple...but I guess it looks alright white."

So all you who were against painting the brick white...at least we didn't let our 3 year old pick out the color!!

I'll keep you updated with our progress...

Sunday, August 21, 2011

To Paint Or Not To Paint...

...That is the question!


The way my living room looks on any given day.

We are debating on whether to paint our fireplace or not.  This topic makes some of you cringe and some of you giddy.  We get that.  We are on the fence right now.  Here's the reason why we're thinking about doing it and the pros and cons for taking the plunge.

Reason:  Our living room is dark.  We have one source of light...a large sliding glass door to the covered patio.  Since the patio is covered, not too much light gets in.  Which is good because it never gets too hot in our house, but bad because then we don't get a lot of natural light in the room.  As you can see in the photo, the fireplace takes up almost the whole main wall in the room and it's dark brick.

Pro's:
  • It will brighten up the space.
  • It is the cheapest, quickest, "easiest" solution.
  • I think it will modernize a somewhat dated fireplace.
  • A painted fireplace will be easier to dust and clean than the way it is now.  Anything you dust with now just gets snagged and caught on the scraggly brick.  I feel like the paint will make it "smoother."
Con's:
  • It's permanent.  If we end up hating it...we can't go back.
  • It might be too much white in the room.  Since that wall is almost completely fireplace, it might overwhelm the room.
  • White fireplace will probably show dirt more, but see Pro above related to dusting and cleaning.

By the way...I think a white fireplace at Christmas time would look amazing!...Right?  And I think we'd keep the mantle wood...just another btw.  Oh and we have new curtains to hang on an actual curtain rod...imagine that!  We're gettin all adultified in the living room.


Everyone has referred me here - Young House Love.  Check out the last room's before and after pics (the one with all brick and paneling walls).  Pretty much amazing...right?

Have you taken the plunge? Were you scared? Did you regret it? Want to send me your before and after pics???